

The 1980s called, wants its stippled ceiling back
Strapping, adding new drywall best way to smooth over textured ceiling complaints
Advertisement
Read this article for free:
or
Already have an account? Log in here »
To continue reading, please subscribe:
Monthly Digital Subscription
$0 for the first 4 weeks*
- Enjoy unlimited reading on winnipegfreepress.com
- Read the E-Edition, our digital replica newspaper
- Access News Break, our award-winning app
- Play interactive puzzles
*No charge for 4 weeks then price increases to the regular rate of $19.00 plus GST every four weeks. Offer available to new and qualified returning subscribers only. Cancel any time.
Monthly Digital Subscription
$4.75/week*
- Enjoy unlimited reading on winnipegfreepress.com
- Read the E-Edition, our digital replica newspaper
- Access News Break, our award-winning app
- Play interactive puzzles
*Billed as $19 plus GST every four weeks. Cancel any time.
To continue reading, please subscribe:
Add Free Press access to your Brandon Sun subscription for only an additional
$1 for the first 4 weeks*
*Your next subscription payment will increase by $1.00 and you will be charged $16.99 plus GST for four weeks. After four weeks, your payment will increase to $23.99 plus GST every four weeks.
Read unlimited articles for free today:
or
Already have an account? Log in here »
Hey there, time traveller!
This article was published 17/12/2022 (1098 days ago), so information in it may no longer be current.
It isn’t the first time in my renovation career that a homeowner is disgruntled with a textured or stipple ceiling. In the older suburbs, many houses are also plagued with unsightly cracks in the plaster, especially at the corners. At a current jobsite near the Polo Park area, such are the woes of my client. In lieu of “fixing” the issues, it was better to cover them all up, altogether. And while at it, additional lighting was also proposed, a prospect eagerly accepted by the homeowner.
Textured ceilings were popular for a while, several years ago. More recently, clients have elected to get their ceilings redone. Although scraping the ceiling flat is an option, this process never seemed a viable approach to me — no matter how well the ceiling is scraped, there would be the odd blemish that would need to be filled, and the mess of scraping… oh the mess.
Through my own experiences, it was less “messy” to simply strap the old ceiling and apply new drywall sheeting. Once the drywall is up, taping and mudding the seams is a straight-forward process that requires very little sanding, priming, and painting. Moreover, adding additional instances of lighting becomes a plausible activity when strapping a ceiling, in that the wiring elements can be done before the new drywall is up, without the worry of blindly pulling wires through “existing” ceiling cavities. Wherever access points are needed, the appropriate cut-outs can be done to accommodate. After all, the entire ceiling will eventually be resurfaced with new drywall. Therefore, any holes created will eventually be hidden away.
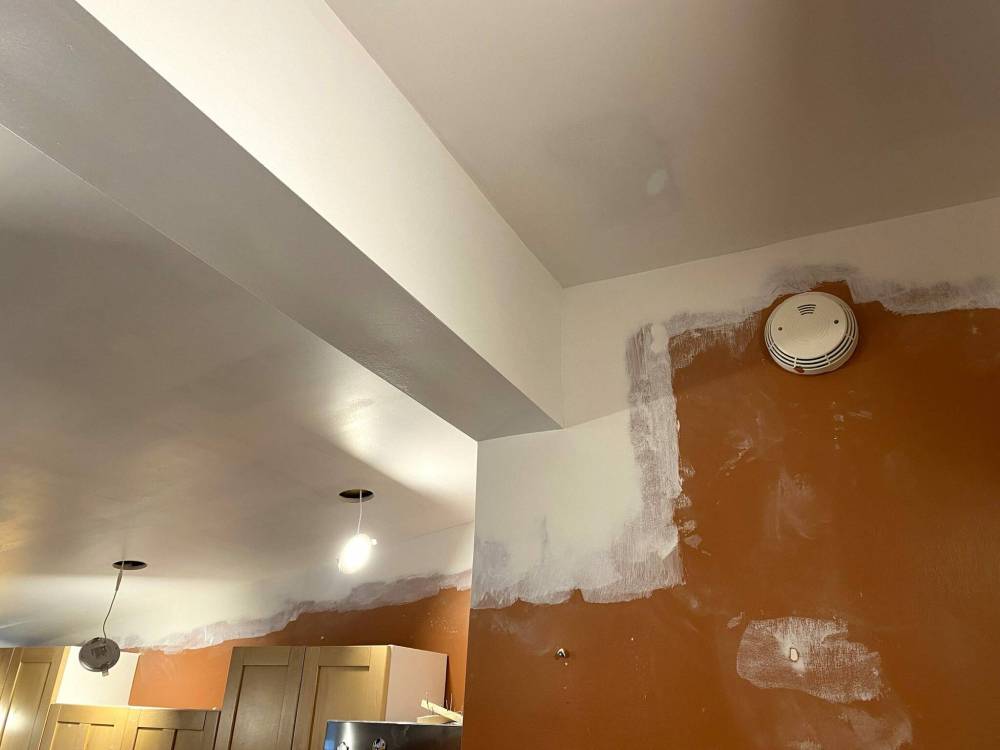
The existing beam creates a natural quarantine between the dining room space and kitchen area.
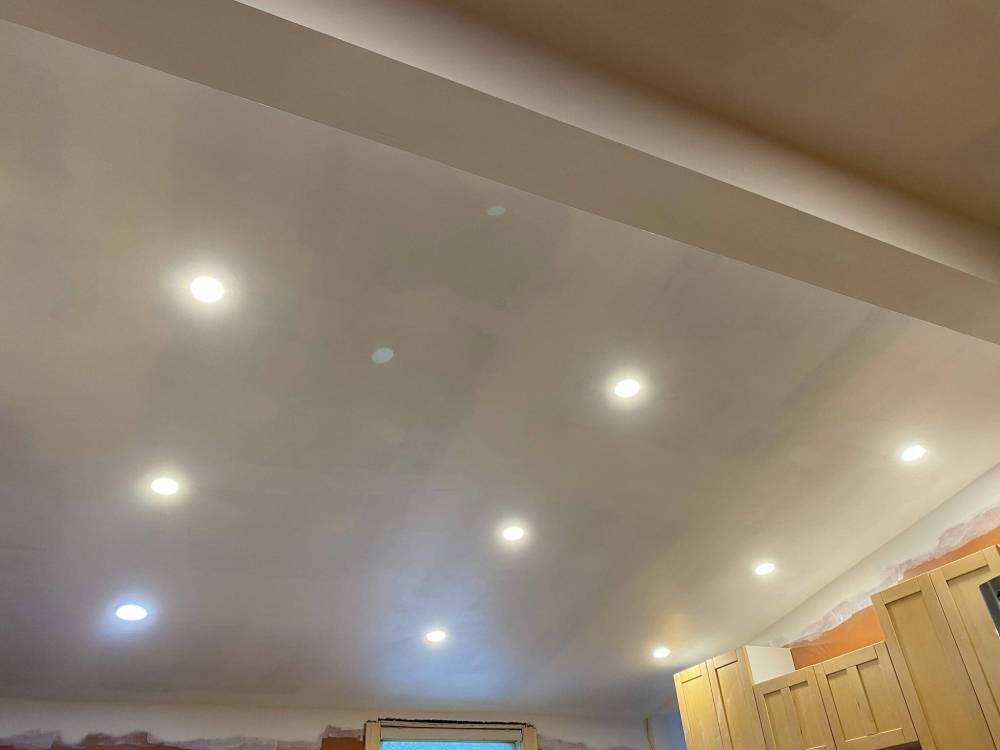
Two ceilings at the jobsite required attention; a ten-by-ten foot dining room plaster ceiling between the living room and the kitchen, as well as the entire 13-by-12 foot kitchen ceiling. The dining room would receive four new four-inch LEDs, while the kitchen would get eight four-inchers (on two separate circuits), and a five-inch LED at the back door entrance. This new lighting layout will greatly improve the overall lighting, as there was only one existing ceiling light in the dining room, and a few awkwardly placed lights in the kitchen.
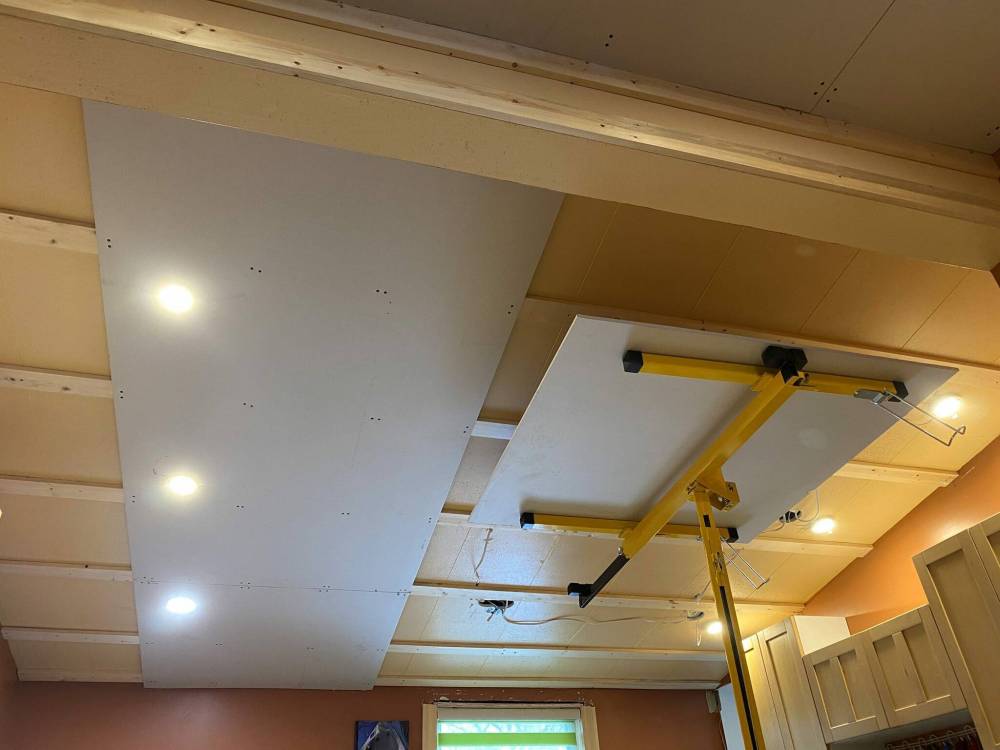
To begin, the upper truss locations were mapped. In this case, the trusses are set at every 16 inches. Temporary screws were positioned along the ceiling where the trusses meet the walls, at a slight protrusion to erect string lines to indicate truss placement. The 2×4 strapping was then installed on the flat perpendicularly to the trusses, pre-fastened using three-and-a-half inch screws. Once all strapping was placed along a ceiling area, the 2x4s were then permanently secured using 6-inch lag screws, at every junction below the trusses.
With strapping in place, the wiring and LED lighting boxes were added based on the new lighting design layout, pre-wired and tested prior to the installation of drywall. Once everything checked out, drywall was loaded onto the lift and hoisted into position, affixed to the 2x4s until the entire ceiling was coated. A four-inch auger bit was used to pierce the drywall in the precise location of each LED, and the lighting came to life with the flip of a switch.
The taping and mudding process was typical. The long and short seams were first taped, while the corner seam along the entire perimeter of the “new” ceiling was achieved last. The subsequent coats of finishing mud hid the tape more and more until the final skim coat produced a near smooth surface throughout. After allowing the final coat of mud to cure overnight, light sanding along all areas ensures a flat and cohesive surface at all seams, including the corners where the ceiling meets the walls. With the newly introduced areas sanded, a coat of primer is added to seal the surface until the homeowner is prepared to have the entire house interior painted. Until that day comes, at least the ceilings look fresh and new. And, let’s not forget about how much more light the new LEDs provide.
Every scenario is different, and can present a variety of unforeseen challenges. In this case, both ceilings are limited to specific areas. When ceilings are continuous throughout, it becomes necessary to strap ALL ceilings that lead from the main area into, let’s say a hallway or separate space, short of “adding” a false break along the ceiling to minimize the volume of work required to strap. No matter the criteria, strapping is a great method to alleviate unsightly ceiling issues or stipple — because once the job is completed, it’s a brand-new ceiling.
PHOTOS BY MARC LABOSSIERE / WINNIPEG FREE PRESS
After the drywall is taped and mudded, sanded and primed, the new lighting better illuminates the entire kitchen
RenoBoss.Inc@outlook.com
photos by Marc LaBossiere / Winnipeg Free Press
While contractors are often loath to simple cover up problem areas, in the case of stippled ceilings, adding 2x4 strapping and new drywall is best.

The LEDs dangle temporarily as the newly drywalled ceiling (and existing beam) are primed, awaiting coats of paint.

The 2x4s are secured to the existing trusses using 6-inch lag screws at every junction where the strapping overlaps a truss (locations pre-marked with string lines).